
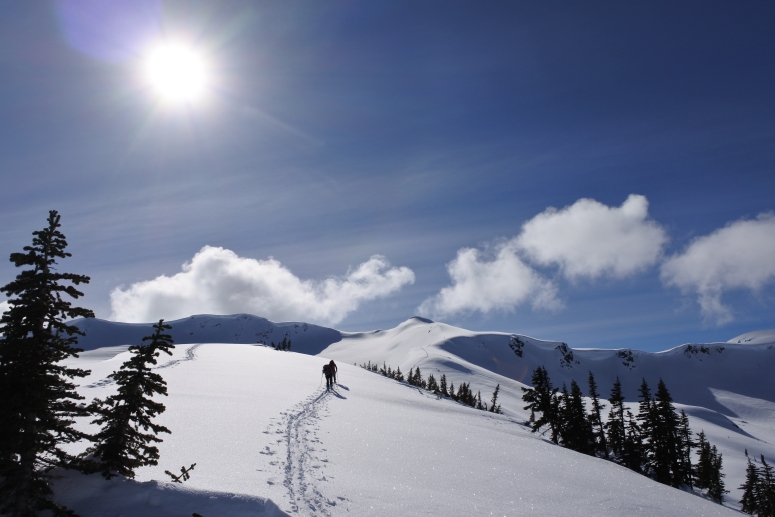
Last weekend I climbed 5400 feet over 12.5 miles in perfect weather, over snow and rocks, in order to be rewarded with expansive views of the central Cascades. I saw a total of five people on trail. When I arrived at the summit, I noticed that the register was only half full, even though it had been placed there in 2002.
Where was I? Three Brothers, an obscure peak in the Teanaway Range.
And how did I get there?? Well, that’s what I want to talk about.
The Comprehensive Guide to Finding Your Next Adventure
Step 1. Create your bucket list.
If you wait until the last minute for your adventure inspiration, you may find yourself with analysis paralysis. Chances are you may even end up staying at home eating Doritos instead of experiencing the great outdoors. Hey, no judgement! I’ve been there. But imagine how much easier it will be to rally if you already have a list of dozens of hikes you’ve had your eye on for the past few months… or years! You’ll feel the same way about your future hikes as Gollum does about the ring.

The Washington Trails Association (WTA) website lets you save hikes to your “Backpack” if you create a free login. The website lets you narrow your search in all kinds of neat ways, including distance, elevation, or even whether there are wildflowers. They also have a phone app that lets you access vital info (driving directions, summary) for the trips in your Backpack offline.
The WTA site is awesome and comprehensive, but my personal bucket list always stems from Peakbagger.com. Sure, the website has that “hasn’t been updated since 1998” vibe, but the app is actually very streamlined and useful. Peakbagger users are able to create lists of peaks, and then other users can come along and complete those lists. And if you’re anything like me, the satisfaction of ticking off items on a list will add a dimension of joy to your hike that can overcome all kinds of suck while you’re actually out there.
The other thing I really like about Peakbagger is that it seems to funnel me toward increasingly obscure peaks. And that’s a good thing! For one, it redirects traffic away from overused trails. For another, it helps to maintain underused trails that are at risk of becoming overgrown or forgotten. You’ll accomplish this simply by hiking on the fading, yet established, trails, but you can even do one better by tossing aside large debris, cutting back overgrowth, or removing the few bits of trash that you see.
If you’re tired of seeing doggy doo bags and hearing lots of noise on trail, then this may be the right approach for you. But I’m not going to lie, it helps a lot if you’re willing to drive 3+ hours on any given day to get the goods. Craig and I use this time to connect as a couple and learn cool new things on podcasts. Similarly, spending the time and money to increase your repertoire of outdoor skills, like snow travel and scrambling, will deepen your experience tenfold.
The pros of unpopular hikes include less crowds and more wildlife encounters. The cons include less crowds (less safety in numbers) and more wildlife encounters (potentially harmful). But for me it’s a no brainer.

In our case, we decided to attempt Three Brothers because it was one of the hikes on my bucket list from the Mountaineers Teanaway Peaks. (Now I only have 3 left – yissss!)
Step 2. Check the weather.
Craig and I generally don’t start planning for the weekend in earnest until the Thursday before. That’s because our primary concern is the weather. Whenever we feel like we can really trust the forecast, we check which parts of the state are predicted to be sunny, rainy, snowy, or windy. If it’s November through June, we also explore the local avalanche conditions (more resources here). Now comes the part where we return to our bucket lists with glee, dreaming about all the areas that might be “in” this weekend. Sometimes when the weather is similar everywhere, Craig just looks at a map and chooses a spot he hasn’t been to before. That’s how we got the idea for this site!
You can also check whether the aurora borealis might be visible 🙂
Step 3. Do your research.
Now you’ve picked an adventure, but that’s just the beginning! It’s time to gather some info that will help you along the way. We generally start with composite trip report sites like these:
- Peakbagger (International)
- Washington Trails Assocation
- NWHikers (Northwest)
- Summit Post (International)
- Turns All Year (Northwest Skiing)
- Cascade Climbers (Climbing, Mountaineering)
- Club Tread (British Columbia)
If we can’t find what we’re looking for, we hop on Google to find individual trip report sites (like this one). For our adventure last weekend, Craig found a recent trip report for Three Brothers on Northwest Hikers which included a lot of the info we were looking for.
If you can’t find a recent trip report, then high five because you must be getting really rad. Try looking for reports from a similar time of year in previous years as well as trip reports for other trips in the area that are a similar aspect (eg. south-facing) and elevation. This will give you a good sense of where the snow is at.
While you’re perusing trip reports, take note of the following:
- Can you drive straight to the trailhead? Is any particular vehicle or pass/permit required?
- What gear did the writer bring and use?
- When will you reach snow, if at all? (This is relevant year-round in the Cascades.)
- What’s going on with snow bridges and other hazards?
- Are there flowing water sources?
- What skills were required?
- Also keep your eye out for quality of life details like whether there were mosquitos… or ripe berries!

Some delicious huckleberries
As you’re doing your research, you may realize that you don’t have the skills/gear/conditions required for this adventure. And that’s okay! In fact, it’s about a million times better than arriving at your destination only to realize that you’re in over your head. Just save this one for when you’re ready and go back to Step 2.
Step 4. Gather the necessary supplies.
I use a checklist app on my phone to make sure that I’m bringing the right gear for every type of adventure. Before your trip, make sure that you have any navigation tools necessary. When it comes to unpopular hikes, you can’t depend on an obvious trail or tracks to follow. If you want a paper map, you can make and print one for free at CalTopo. Craig carries a GPS with pre-loaded maps (and even pre-loaded GPS tracks he found from other trip report sites if he’s particularly unsure about a route). I use the Gaia GPS app on my phone, which does the same thing without any added weight. In either case, you’ll want to bring some backup battery power since this could be a life or death item.

If this journey takes you to a super, duper obscure destination that doesn’t even have a designated trail, I would say… congratulations! Some of my favorite memories have been made in the remote wilderness. But this is also the time to seriously up the ante on following Leave No Trace principles. When you’re off trail, travel on snow, rocks, and game trails and avoid vegetation whenever possible. Try to make it so that a hiking detective would have a really hard time figuring out that you were ever there.
Step 5. Pay it forward.
After you’ve completed your adventure (or misadventure), consider writing a trip report with some of the helpful tidbits mentioned above, so the next person can also have a fun and safe time.
One final note: We’ve tried writing our own trip reports with these ideas in mind, but we always welcome input on how we can do better!
Post may contain affiliated links